Friday, August 22, 2014

Plein air painting in Silverlake, CA

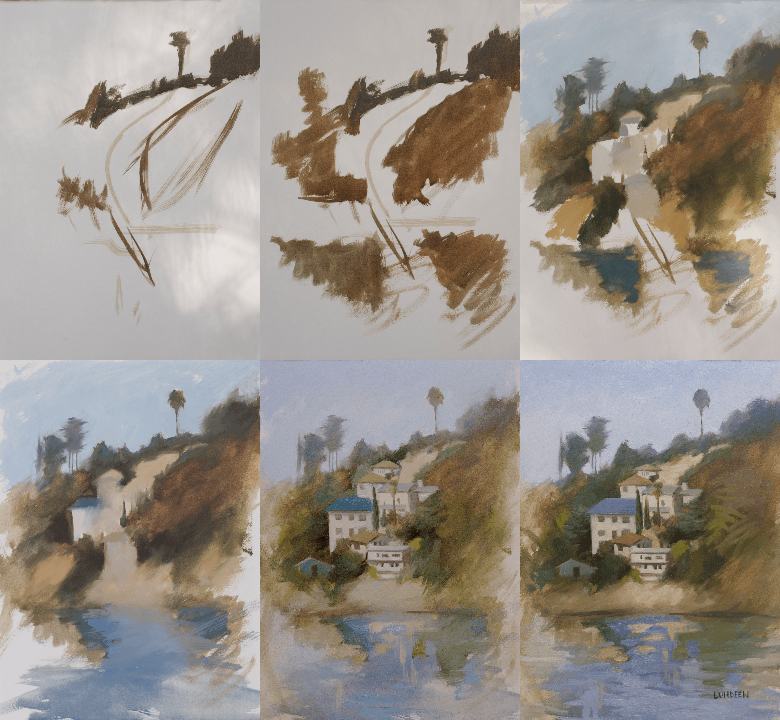
Last week I found myself painting at the Silverlake reservoir in Los Angeles. I thought it would be fun to take some pictures as I went along and give a little insight into how I went about my painting. 

By no means do I have a standard way of approaching every painting, and especially with plein air I am still figuring things out as I go most of the time. I actually broke away from some of the things I usually do when painting this, so probably the next demo I post here will be a little better!


The Silverlake hills are beautiful but a little overwhelming for a 2 hour painting. I zeroed in to find a composition I liked and settled on the spot below. I was kind of far away and looking through this lovely chain-link fence, so I had to find a basic pattern that was appealing and not worry about the details.


I liked this palm tree at the top and the fact that this spot had a light pattern coming down from that tree, curving down the hill. You can see it a little better in this picture. 


If you compare it to the picture of the finished painting here, you can see that I moved things around and simplified things to suit the composition I wanted. However, I kept this basic light/dark pattern in mind until the finish, and it helped me to stay on track with the basic idea that I started out with.


I'll say now that I almost always paint a neutral wash on the surface to get rid of the white background before I start. And I probably should've done that on this one too. But I decided to jump right in and start. I drew a curved line to remind me of the flow I wanted to keep in this painting, and started placing the darks where I wanted.

I sloped the top of the hill on more of an angle as I didn't like it so flat.


I built this slowly, jotting down notes of darker color to slowly get the placement of my shapes in as well as figuring out what I wanted to do with the color. I made the colors more blue and grayed down as they receded, in order to create a sense of space, and got warmer greens in the front. I tried to keep the paint fairly thin and save the thicker paint for building up the light areas.


Below you can see it developed a little further as I put in the light shapes and figured out a bit more where I wanted to put things. I barely did any detail at this point--for one thing it was very hard for me to see from where I was! So I decided to take it home and finish it in my studio. At this stage, there was not much down, but it was very helpful to start this way instead of doing the whole thing from a picture.


I always take pictures right before I start the painting, and continue taking them as light changes until I'm ready to finish up. I'm really glad I did in this case, because look how much the reflections had changed over the hour or so I had been painting! 


Continuing in the studio:

Now I began building the details, while trying to continue simplifying what I saw and not getting too picky about the details. One thing I really didn't like from the start is how the composition is cut off with the bank of the reservoir.  So I kind of downplayed that area and you can see I ended up just keeping that loose and darkened it up on the sides.


Ta-da! The finished painting!


Reflections - 9"x12" - oil on paper (Arches Oil Paper!)

Hopefully this was interesting and useful in some way! Come back soon. :) 

This painting is available for sale through Art Cricket LA 


Wednesday, July 16, 2014

Painting Sunsets: Part Two


A few nights after my first sunset painting, my husband and I were about to go out to dinner. He waited out in the living room while I went to the bedroom to get my shoes. Suddenly he hears my squeal: "Wow, look at the sunset! Hold on, sweetie! I just have to take a quick picture of the sunset, and paint it, and then I'll be ready to go." Poor guy.

Once again, it was so liberating to not worry about making a great--or even good--painting, but just getting down as much as I could for a fast study.


After a bunch of these twilight/sunset paintings, I'm a lot better at painting from memory when I need to recreate this light. Here is another twilight painting that I started on site and finished at home, mostly from memory. The actual painting is a little more mellow and less contrasty than you see here.

"Fleeting Light" - oil on board - 8"x10"

Here's the best photograph I was able to get of that sky right when I started the painting. When you compare the two you can really get an idea of the color and subtlety that you lose with the camera.


Here's how much the light had changed by the time I finished my study--somewhere around 10 or 15 minutes. Don't you love that purple light?


Here's a close up so you can see how little painting I actually got down on-site. But it was enough to get down the main elements of color in the sky (which you can't really see here) and jog my memory when I got back to it.  Once dry, I painted right over the existing study.


And here's one more I did for fun, just from my noggin. :)


Thursday, June 19, 2014

Painting sunsets: Part One

Recently I've painted a bunch of sunset/twilight paintings and I can't get enough. I really feel it's something that can't quite be captured on camera but can be translated so beautifully with paint.

For awhile when I was driving around and would see an amazing sunset, I would actually get angry that I couldn't pull over on the freeway that second and paint it. It really kills the natural enjoyment of a sunset, let me tell you!

Well, a couple months ago I was in my studio working on a painting, and the sun started going down. I saw how pretty the sky was and felt sad that I wasn't outside painting, and I finally decided to do something about it! I don't have the greatest view from my living room window, but enough was enough! I turned my easel around to face the window and grabbed the first little canvas I could get find, and I painted furiously for about fifteen minutes. When the light changed too much, I grabbed another canvas and had another 15 or so minutes before all the light was gone. Somewhere in there I yelled for my long-suffering husband to grab my camera and take a few pictures for me. 

Here's the second painting I did. 


After it dried the next day (thank you, Los Angeles heat), I painted over it, using a photo to remind me what it looked like. 


I mostly worked from memory, but the photos were helpful as a reminder. This is the view from our window:


I have to remind myself all the time that painting is all about designing and distilling, not just copying what you see. I don't necessarily get inspiration from this scene with all the distracting details, but there is a lot of good information to grab and use for your own composition.

Saturday, January 11, 2014

Anatomy for artists -- écorché with Rey Bustos

An écorché is a painting or sculpture of a human figure with the skin removed to show the musculature.

I had the privilege of taking an écorché class with Rey Bustos last Summer at the Los Angeles Academy of Figurative Art (LAAFA).

Over 10 weeks, we built a 16" tall man in Sculpey clay, getting hands on, 3-dimentional knowledge of the human figure. It was a very challenging class for me, but definitely worth it. You can see Rey's website at www.reybustos.com. He's a great teacher--so passionate about what he does, and generous with his time. I hope I'll have the opportunity to do another workshop with him sometime soon.

Week one -- starting with the armature


Starting to come together, lots of blood, sweat and tears later.

Clay has been baked and painted, now starting to lay the muscles on.

Finished ecorche -- front view
Finished ecorche -- side view
Finished ecorche -- back view