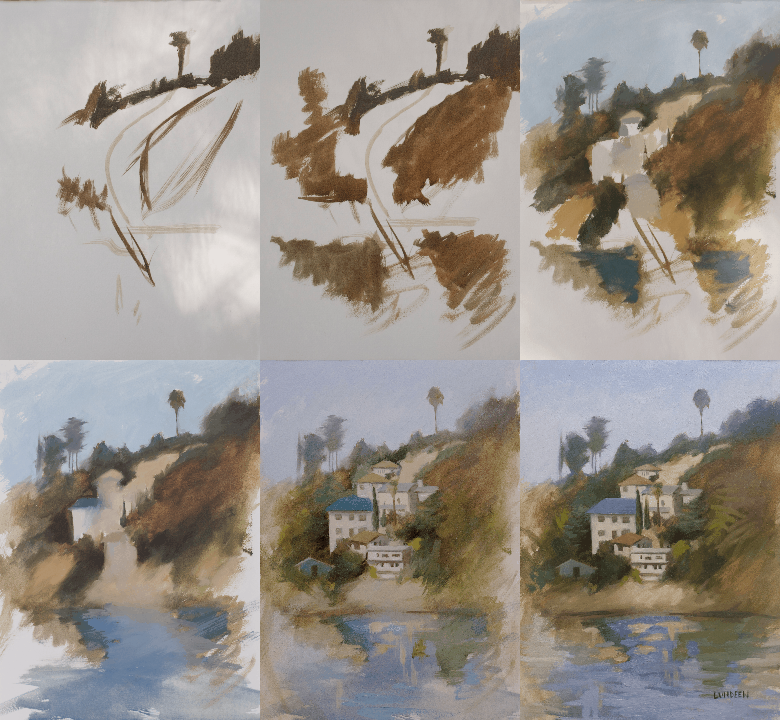
Last week I found myself painting at the Silverlake reservoir in Los Angeles. I thought it would be fun to take some pictures as I went along and give a little insight into how I went about my painting.
By no means do I have a standard way of approaching every painting, and especially with plein air I am still figuring things out as I go most of the time. I actually broke away from some of the things I usually do when painting this, so probably the next demo I post here will be a little better!
The Silverlake hills are beautiful but a little overwhelming for a 2 hour painting. I zeroed in to find a composition I liked and settled on the spot below. I was kind of far away and looking through this lovely chain-link fence, so I had to find a basic pattern that was appealing and not worry about the details.
I liked this palm tree at the top and the fact that this spot had a light pattern coming down from that tree, curving down the hill. You can see it a little better in this picture.
I'll say now that I almost always paint a neutral wash on the surface to get rid of the white background before I start. And I probably should've done that on this one too. But I decided to jump right in and start. I drew a curved line to remind me of the flow I wanted to keep in this painting, and started placing the darks where I wanted.
I sloped the top of the hill on more of an angle as I didn't like it so flat.
I built this slowly, jotting down notes of darker color to slowly get the placement of my shapes in as well as figuring out what I wanted to do with the color. I made the colors more blue and grayed down as they receded, in order to create a sense of space, and got warmer greens in the front. I tried to keep the paint fairly thin and save the thicker paint for building up the light areas.
Below you can see it developed a little further as I put in the light shapes and figured out a bit more where I wanted to put things. I barely did any detail at this point--for one thing it was very hard for me to see from where I was! So I decided to take it home and finish it in my studio. At this stage, there was not much down, but it was very helpful to start this way instead of doing the whole thing from a picture.
I always take pictures right before I start the painting, and continue taking them as light changes until I'm ready to finish up. I'm really glad I did in this case, because look how much the reflections had changed over the hour or so I had been painting!
Continuing in the studio:
Now I began building the details, while trying to continue simplifying what I saw and not getting too picky about the details. One thing I really didn't like from the start is how the composition is cut off with the bank of the reservoir. So I kind of downplayed that area and you can see I ended up just keeping that loose and darkened it up on the sides.
Ta-da! The finished painting!
Reflections - 9"x12" - oil on paper (Arches Oil Paper!)
Hopefully this was interesting and useful in some way! Come back soon. :)
This painting is available for sale through Art Cricket LA


Plein aire is challenging because of the changing light, at least it is for me. I do want to practice it more. Good job on yours!
ReplyDeleteThanks, Iris! Yes, it's tricky--certainly does take a lot of practice!
ReplyDelete